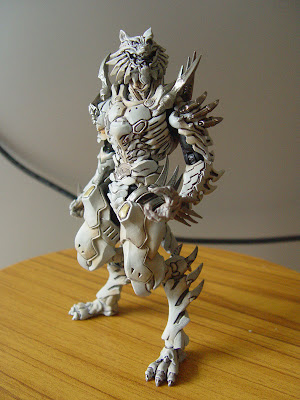
About a week ago I saw the SIC No. 28 Kamen Rider Faiz (from Kamen Rider 555) with the alternate Wolf Orphenoch form. Needless to say, I bought it.
There is a big community that enjoys toys, and there are quite a few that enjoy taking photographs or even compositing them into live action scenes. My original idea of course was to do the same. Unfortunately, after spending some time on google, I was unable to find anything that would work for me. I wanted some kind of roman/greek architecture site, as I felt that the design of the Orphenochs were based upon the designs of that era. (Side Note: The SIC 28 toy is not the same as that on the show, but is a re-imagined version. I like it.)
So... what next? Well.... It's Houdini time! One word of warning, I did not look up any reference for this little scene, which is what all of us FX people should do. I just thought up - Pillars. Tiles. Done.
I first took a photo of the toy. Wish I'd use something other than a wooden stool - masking was a pain :P Next, I loaded this up as a background in Houdini, and then created a one frame camera match. I then started to create my scene.
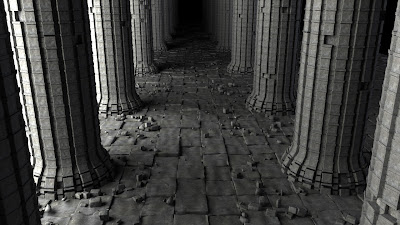
The Houdini scene itself is very simple. The pillars are just some blocks copy stamped onto modified tube geometry. The floor, same thing - flattened boxes with a noise pattern on them, copied onto a grid. In hind sight I should have shifted each line of the floor by half a tile, so generate more randomness. But ah well, the render time was killer. Little bit more on that later.
Now was the little problem... Each pillar was running up 850k polys. And I had 18 of those! The tiles were quite bad as well, running up to 1.4 million polys for the whole lot (each tile was about 250 polys). This is bad, ladies and gentlemen. The reason why I was pushing the high poly counts was because the actual geometry was run through a mountain sop to get the fine detail (Noise Modifier, for the max people :P) - if this was a serious project I would be looking into displacement maps to get the fine detail.
And that's just the Pillars and Tiles; after creating those, I found that I couldn't load more than 1 of the pillars in the viewport lol! So what did I do?
Very simply, Houdini's renderer supports a "Delayed Load" procedural, that allows the renderer to pick up the geometry and render time; hence, this is how my scene looks like in the viewport:
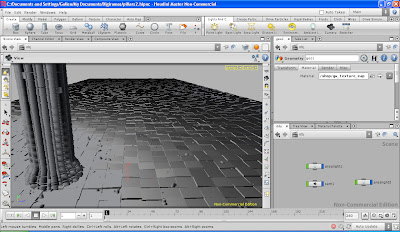
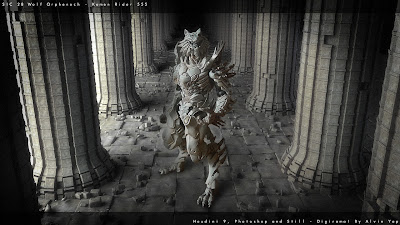
Note that I only switched on one of the pillars, and that they are using the low-res stand in geometry. During render time, Mantra, Houdini's renderer will then pull in the hi-res geometry for rendering. This is the initial render before post:
A side note, the scene seemed very empty original with just the pillars and tiles. To create more chaos, I did 3 separate Rigid Body Dynamic simulations, 2 passes of pebbles, and 1 pass of "blocks". I deemed the location old, and worn out, so had some pieces of the blocks fall out. The pillars are also auto rotated in Y (rand(opdigits("."))-0.5)*360), even though I was only using 1 base mesh for all 18.
One thing about the blocks simulation, was that I did the simulation using low res geometry; I had 350 blocks drop down from areas around the pillar, and each of them was a very basic deformed cuboid. Once the simulation was done, I used a Dop Import SOP, to transfer the animation over to the hi-res geometry. I had originally built the hi-res geometry based on the same dimensions of the low res geometry, hence they came in perfect. If I were to simulate the hi-res geometry... it would work. And it would probably take hours to sim as well. The low res sim was done in a few mins.
Finally, rendering. I actually tested this scene up to 6k res, and it was actually able to render on my 2GB machine, using about 1.4gb of ram. This was with the micropolygon render type. Next... hehehe.... PBR, Physical Based Rendering, the new rendering algorithm for Houdini 9. Now the way PBR works, it requires the entire scene to be put into ram to be rendered - this is the way the path tracing algorithm works. What's worse, if you have 3D motion blur, you'll also need to load all the necessary segments into ram for rendering (this is where velocity blur comes in :P)
I was only able to push the scene up to 720P HD with the PBR, and left it at that. Any higher and I'd run out of ram. I think it did an admirable job - if I used Linux (yes I was on windows - because I only have 1 license of Houdini Apprentice HD. So there.) I would probably be able to push it perhaps to 1080P, given the efficiency of linux.
Total time to create the initial pillars and blocks? Under an hour. Debris took a while - a good part of perhaps 2 - 3 hours as I sought to get the right amount and spread of debris - many, many re-runs of the sim. Did I mention that while I was doing it, I was watching many, many DVDs? :P I think this is a very good example of how complex scenes can be created very quickly with the power of the copy SOP. It's one SOP (as well as the stamping options) that everyone using Houdini must master.
Bottom line for the rendering, if you have uber complex stuff to render, use the Mantra Delayed Load shader, with Micropolygon style rendering, you can go crazy with the detail (at the 6k test 6xxx X 4xxx, mantra was consuming 1.4 gb of ram..).
Props to Dias for suggesting changing/adding shadows and other tweaks!
5 comments:
cool! post here leh! http://www.flickr.com/groups/467171@N25/pool/
Done :)
nice...though the wolf looks CGi as well. heheh.
How about another view from below eye level?! that's gonna make the wolf look big and really imposing. Just a suggestion.
Ehehehe good idea but I did not model any roof :P Good rainy day project idea though :)
Interesting Houdini workflow. Great render!
Post a Comment