Saturday, February 28, 2009

Black Hill Conservation Park | South Australia

Black Hill Conservation Park is a quick half hour ride on the Adelaide Metro (Bus 178 or 179), easily caught off the North Terrace. It's located just north of Morialta. This beast of a hike is probably less strenuous than the Water Fall Gully hike up to the Mount Lofty summit, but it does have its own challanges.

You do get spectacular views of the built up areas when you get high up the hike. The peak is about 450 meters high (!!!!) and it totally drained me. Thankfully, the return hike was nearly 100% downhill.

We were leary of snakes, but most we saw were these little critters. If you look closely, you may notice that it recently got injured :(

Random tree really, I just thought it'd look good in B&W.

You can see the city again in the background, and how high we can get up. Probably a bad example as this was on the way home, and had already walked downhill for quite a bit.

I'm throughly enjoying my new flash; apart from adding the beautiful catchlight, I didn't realize that most of my shots were at low iso (in this case... iso 100!); the flash was really doing a wonderfull job.

Thursday, February 26, 2009

New Toy: A BibblePro Plugin :)

Sean Puckett is an independant developer of Bibble plugins. He makes a whole range of lovely plugins that really enhance Bibble's already considerable capabilities by a whole new level. I've collected a small bunch of them over the time I've used Bibble, and at 10 or 20 dollars each, they don't cost too much if you get one or two every few months. Hot favourites are his awesome black and white plugins, but I love his other plugins such as Ansel that gives the capability to adjust contrast by zone (hence the name, Ansel :))

I'm probably going to shoot the Volleyball SA finals competition soon, and the way I usually grade my images are NOT good for human skin tones. (It's good for Dingoes, but I digress). Gina is one plugin that will sort me out. The free version (Yes, lots of Sean's plugins are free... and work very, very well) already fixes up the images the way I want very quickly - especially since I'm NOT into portraiture. But I thought getting the pro version would be cool to support independant developers, plus, there's probably some nifty extra features.

Example one: Provia curve applied, and saturation *immensely* boosted. Gives loads of punch, but for people. Hmm. Kinda sunburnt.


Gina is able to magically target skin tones and perform some tweaks to them.


It's not always perfect, especially if if the background has similar tones to the skin you want to fix up. But it does an awesome job, easily for people like me who rarely take people photos.

One thing about Sean's awesomeness is that he has a point system for plugins you purchase. I've clocked up a bit of points, and have since got 2 pay plugins, for free! The two images above have been run through Matty Pro, my latest plugin that I got using the point redemption system. It has quite a few functions such as watermarking, frame creation what I enjoy using currently, putting a custom .png image with alpha channel as a frame. Less time spent in GIMP the better :)
Buses on the opposite track zoom by.

The control wheels attached to the main wheels.

View from a passenger's seat.

Ok took awhile but I've been spending the last few nights doing some photo related stuff. BAD! Anyways, as mentioned here's a few pictures of Adelaid's O-bahn system. It's a very new experience to get off a normal road, and hop onto a high speed track. The bus runs automatically thanks to the small guide wheels attached to the main wheel at a pretty fast clip. For more information, may I guide you to its wiki page.

Wednesday, February 25, 2009

Why SideFX rocks

http://www.cgenie.com/cgenie-content/104-cg-community-survey-upgrades-09.html

Basically, if you read through it you'll see that SideFX has really good customer relationships with their customers. And it's no surprise.

Just about 4 hours ago, I was in a teleconference with them (adelaide people together with my other colleagues in Sydney). Speaking to us weren't the sales or marketing team, but the developers themselves. They were presenting to us the new stuff coming out in the next houdini revision - which I dare say is huge, something on the scale of Houdini 8-9 kind of changes. I'm pretty certain this will give many, many people pause when it's released.

What's more, they were also going through a list of stuff that my supervisors sent in; improvements, changes, suggestions by us that we want in Houdini. They really spent time looking into our suggests, and implementing many suggestions. I'm sure based on the link above, some other companies may do this, but this is the reason why I'm so supportive of SESI.

Plus, think about it. Rising Sun probably does not compare in size to the big players in London or USA that uses Houdini (Imageworks, Framestore for example). And yet, they are willing to spend time to support us. Is that service or what? :) Add in very responsive bug fixes and daily builds, I'm certain 2009/10 will be a very interesting time to be a Houdini user.

Saturday, February 21, 2009

Nikon SB 600 | First day usage!

Got my SB600 yesterday, tested it out today at Gorge Wildlife Park, and here's a mini-review/notes on the new flash!

The flash
My first nikon flash; I've only owned two TTL flash guns prior to this, a Metz 32 (works, with my D200 in auto mode.) and the Minolta 3600HS on my Dynax 5. It's fairly sized, and the head swivels up 90 degrees with detents, and also swivels all the way back left, and 90 to the right. There is a flip down diffuser to allow the flash to spread the light for lenses up to 14mm.

The flash uses 4 AA batteries, and has several buttons to control the flash on the back panel. The package includes the usual assortment of manuals, plus a nylon carry pouch and a bracket to allow the flash to stand on its own.

Things I like about the flash
Worked out of the box.
Wireless flash!

Thing I don't like about the flash
Occupies a physical volume in space.
Uses batteries (I prefer photosynthesis).
Doesn't make tea.
Ok seriously, the main issue I don't like about it, is that to enable wireless flash, I need to go into a custom function menu that needs an annoying two button hold down sequence. In a perfect world, so long as my flash is off the shoe, it should just automatically go into wireless mode, and back to normal when the camera is mounted. I think this is how the 3600HS and Dynax 5 worked, however, it's a few thousand kms north of me right now so.... (in the field today though, that didn't bug me)
Also, I'm not sure how water resistant this flash is... I'm really not going to try it out!

Bottom Line
Good general purpose flash, very nice for using the Nikon CLS.

In use at a wildlife park
Gorge Wildlife Park is located fairly near Adelaide, but for someone taking public transport its about an hour on the transit system. I took the J1 bus along Grenfell Street, and after a very quick ride along the O-Bahn (will blog about that soon), stopped at Tea Tree Plaza interchange and switched over to Bus 800 by Affordable Coachlines. The 800 takes a windy path into the Adelaide Hills, arriving about a half hour later at Cudlee Creek.

Gorge is very similar to 
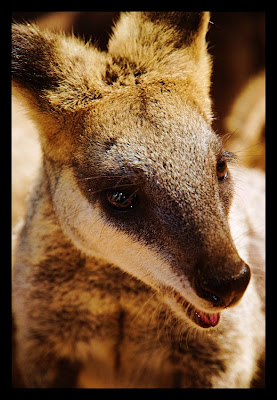
Cleland Wildlife Park, however, it contains a lot of furballs more commonly found in Zoos, such as Panthers, Cassowaries, monkeys of all sorts, and a *huge* array of birds. The main attraction of Koalas for are available several times a day, and there are huge mobs of wallabies and kangaroos roaming free in two large open areas.

This is one of the first few shots I took, something I would have never taken without a flash: a fully backlit scene.


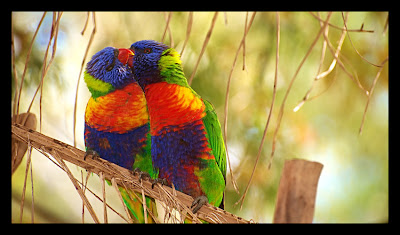
Usually in such cases, if I really needed to take the shot, I'd have to increase my exposure compensation by at least 2 stops or more in order to get the subject properly exposed, but blowing out the background. In this case, the camera seems to be able to keep the background's exposure in check, as well as keep the subjects well exposed.


It works very well when dealing with up-close subjects, filling in the shadows as well as adding a very nice catchlight in the eye.

I use two main lenses today, the 70-300VR and the 16-85VR; both were being changed around quite often due to the variety of subjects. The wallabies in general were very tolerant of the camera being pushed into their face, and did not seem to be affected by the flash at all. (They do seem to be affected by people moving fast/standing up quickly around them, as well as loud noises)

The 16-85 was generally used for up close shots, and the flash recycled very fast - probably at up to my max frame rate - but at extended flashing, it was unable to keep up with the shutter, and later frames would be non-filled.


The 70-300VR in use was another beast, as with the 16-85, I could pull off a burst with flash, but it'd die out slightly quicker. I think it's time to look into a flash extender to complete my kit.


Now, exposure with the flash was throwing me off the whole day. Several times, the shutter speed was in the 1000+ range, in the shade, and at low iso! What I could gather, these exposure values were due to the meter exposing for the background, and leaving the flash to fill in the foreground. Unfortunately, especially for far away targets that are backlit, this often fails as firing off a flash at high sync speed decreases the range, and the flash will be leaving me with a nice underexposure warning on the lcd screen.

One advantage I've noticed, is that I'm now able to shoot at low iso *very much more often*, and that is something I would like to continue to do. Another thing I noticed is that more of what I want to be in my image is now better exposed, so even if I shoot at high iso on my state-of-the-old ccd d200, more of the image is now better lit and hence, less noise. This however does slightly affect the usual way I go about processing my raws in bibble.

I'm going to end this with an example of how the Balanced Fill mode works:


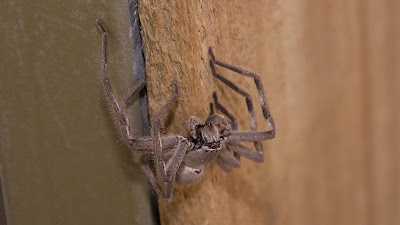
Above with Balanced Fill mode on. (Huntsman spider, it's HUGE.... the head is probably 2cm across... supposedly these can grow up larger than your hand!)


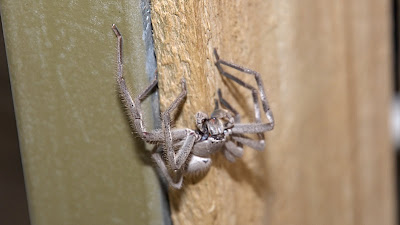
This is with balanced fill off, so while it is fill flash, the camera expects the flash to be the main source of light.....
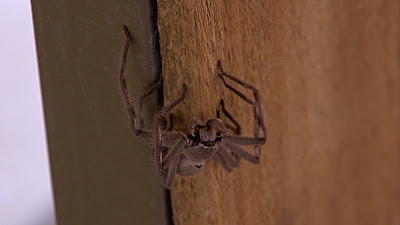


Just ambient.

Going to shoot a beach volley ball event tomorrow, we'll see how the flash works :)

Thursday, February 19, 2009

Must. Get. Flash.

Just got my first set of aussie prints from Atkins Technicolor, and they are _awesome_. There something about the Kodak Enduro paper they use versus the Fuji's I print on back home. Although they are a bit more expensive vs the run of the mill 1 hour quick prints, they _are_ a pro shop. (Note I'm a n00b not a pro, but they rock, see?)

There is something about examining prints vs examining them on a monitor you don't pick up. Perhaps its because I tend to pixel peep the low iso shots, but it's kinda tough to do it on a 5x12 print :P

I am noticing that alot of my wildlife shots have overly dark shadows, something that definitely can be solved if I had a flash. Must admit I do think back to the good times with my Dynax 5 and its most awesome flash system. High speed sync + wireless for less than half the price of a Nikon SB600.

Gah.

Wednesday, February 18, 2009

Eve Online Video Review

Knowing that I used to play Eve Online, my fx lead sent me this link.

http://www.escapistmagazine.com/videos/view/zero-punctuation/208-Eve-Online

Hilarious! And seriously, the last 3 or 4 months before I quit, I was basically quite busy at work and was just enjoying myself watching my XP go up.... then I decided. There are better things to spend time on... that said, the lure of space ship combat can get strong, even if it's just boot kicking :)

GW

Lightwave Core

Newtek's promotional video is quite interesting, Lightwave = one of the 4 major 3d apps? 3 other applications are under one company, they're refering to Autodesk (Maya, Max, XSI), but what about Houdini? Chopped liver? HARDCORE!

Sunday, February 15, 2009

Houdini | Curl Noise Implementation

Curl Noise is a form of noise that avoids the "gutters" and "drains" found in other noise types. Please see the following video:


However, curl noise avoids this effect (don't ask me how!):
Please find the C++ source code from Robert Bridson @ http://www.cs.ubc.ca/~rbridson/.

Currently, I am using perlin noise for my noise lookup. The C++ code I got I *think* uses flow noise. Anycase, as a proof of concept, perlin works very well. Now looking into flow noise et al.

I actually was looking into this noise type when I was doing RND on Harry Potter 6 whilst at RSP, but I was assigned a different shot that needed a totally different kind of effect, so this kind of fell by the wayside. Also, back then, I was totally useless looking and understanding the code anyways. However, recently I've been porting C++ code to Python (See: Programming Game AI by Example, Matt Buckland) thanks to PyGame being so much easier to understand VS C++ and OpenGL. Makes things so much easier! Side note, I've already implemented the first Chapter 2 example, a Finite State Machine in Python. Slowly working more in :)

GW

Saturday, February 14, 2009

Kamen Rider 2009 | Decade

Are any Kamen Rider fans wondering why a TLR the main character uses produces 3:2 and not 6x6 prints?! Seems like he's using a 35mm LOMO TLR! OMG! Product placement! And I thought an iphone was bad :P

Cleland Wildlife Park... again?!

What can I say. Unless there is a wolf conservation park somewhere in SA, Cleland is the nearest I can visit with Canis Lupus Dingo :) Went alone this time, and it was a superb photo op since I could just stay at a location as long as I like.


Weather was pretty warm; being summer in SA. However, as expected, all the creatures were hiding in the shade. The light is seeming to actually get better though. Not as harsh as when I was at the Adelaide zoo.

Anyways, I got most of the photo dump up on facebook. Just a few here to show, as well as some 720p 1:1 pixel crops!


Australian Darter


Little Black Cormorant


My dinner.


I'm seriously considering a flash (and extender), as well as a longish macro lens after todays trip. Hmm.... Gah. One day maybe.

Saturday, February 07, 2009

Fangire!

Today I saw a bunch of people who were being illuminated by the evening glow through a series of stained glass windows. My first though was.... OMG! FANGIRE!

Friday, February 06, 2009

Passion. Does it work?

Had an awesome work week; got my brand new shader looked at by my FX Lead, and he's got so many awesome ideas and improvements that we implemented into it. I'm going to release the source for the shader soon once I clean it up a little. (note: that's for the code I did before I brought it to work, of course). In other news, working on houdini at work and at home does get a little stale, so I'm now switching over to python programming for kicks.

I've been going through pygame.org in order to get in a real python project. I find that I never learn something for real unless I put it into a project of sorts. Also got a side python project for houdini for generating cg env maps using isixpack and hython. Already tested some of the ground work, HDA is already setup. Just left the python side which I'll work on after I dabble a bit more of pygame :)

In any case, was reading through some AI related stuff, and on a paged linked by an A* related page, I found this little nugget about games, whiners, winners and passion. Here's a few lines that make me sit straight up.

Your passions are your own personal Yellow Brick Road. Following your passions will lead you to your own personal Emerald City.
This line is something I think I have been doing right (and wrong) my entire life. I always have loved doing cg related stuff, since my 2d CAD days on my 512k XT. Wrong because I took so damn long to say, screw this. I'm going to chase my "passions". At the very least. I'm on my way. I think :)

If you study topics that interest you, then you are starting down an interesting path. And it will lead you to interesting places (places that are interesting for you).

More related to choosing which field of studies to pick on for the game industry, but it does remind me back in the day, that most of us were probably studying what our parents wanted, or what our peers decided to study. It's especially tough to choose what you like, when you don't know WHAT you like!

In ending. Whoa. This is turning out into a real "blog" kind of post not my usual "heres my photos of touristy place xyz" or "check out this cool houdini schtuff". Well, in ending, I'd just like to say is if there is something you really really want. There has to be some way to achieve it. Sacrifices must be made, and it is something only oneself can decide...

So, do I sound emo enough to be a script writer? Huh?

GW

Wednesday, February 04, 2009

Power Noise + Houdini FX Tools


Based off the Houdini FX Tools: Heavy Smoke digital asset's shader. I re-wrote the entire thing in VEX, and implemented the so called "power noise" that my fx lead uncovered.

Here's a XSI implementation by my CG Supervisor @ rsp: http://blog.ioxu.com/?p=19
And my fx lead, well he's got fractal stuff cooking @ http://www.incubism.com/dan/

It's amazing how easy it is to do stuff like that in houdini. (And XSI of course!)

Sunday, February 01, 2009

Staying home the weekend

VOP AA Noise vs my custom noise


Parts of Australia have been enduring a severe heatwave this last week, and I kinda cancelled all weekend trail exploration plans, but found Sunday's weather to be quite tolerable. Perhaps next Sunday will be just as good?

Anyways, I'm writing a volume shader in VEX (mainly because I'm horrible at manipulating vops when loops are involved...) and wanted a VOP style AA Noise, so I implemented the code for fBm and MultiFractals, but was not pleased with the final look of the noise. I'm pretty certain its just me being too n00b.

I then decided I just wanted as close as possible the look of the noise generated by AA Noise, so this is what I came up with:

sop
gwMyNoise(float frequency=1, offset=0, freqMult = 2, roughness = 0.6, octaves = 4, amplitude = 1;)
{
float gwFreq = frequency;
float gwOffset = offset;
int i = 0;
float value = 0;

for (i=0; (float)i < octaves; i++)
{
if (i==0)
{
value += noise(P * gwFreq + gwOffset)-0.5;
}
else
{
value += (noise(P * gwFreq + gwOffset)-0.5 ) * pow(roughness, (float)i);
}
gwFreq = gwFreq * freqMult;
gwOffset = gwOffset * freqMult;
}

P.y = P.y + value*amplitude;

}


Basically, for the first generation of noise, i == 0, I will just take the base noise values. I subtract 0,5 because houdini's vex noise runs from 0-1. Once that is done, I will multiply the frequency and offset by freqMult, which is by default set to 2. Which means, multiply the noise for every generation by two. Thus for the 2nd generation, noise at twice the frequency is added to the previously generated noise.

However, the roughness parameter is included to modulate the noise every generation; the more generations the noise generated is, the lower its contribution. Of course, if roughness is set to 1, then pow(1, 9999) is still 1, adding the full noise value each generation. Not pretty....

Oh well, now that this test is done, I'm going to transform it into a vector version (ala for 3D space usage), and then proceed to use it in my volume shaders. The above code is for the SOPs context i.e. only for usage in Geometry, which I used to test it on similar geometry against the AA Noise VOP. The frequency multiplier is something I added in. Power to custom code =)

Alvin